Android Studio Flamingo | 2022.2.1 Patch 2
Android 11开发、Gradle Version 8.0、 jdk17
源代码:GitHub - xuexiangjys/XUI: 💍A simple and elegant Android native UI framework, free your hands! (一个简洁而优雅的Android原生UI框架,解放你的双手!)
参考手册:
Home · xuexiangjys/XUI Wiki · GitHub
快速继承Demo:
GitHub - xuexiangjys/TemplateAppProject: Android template project, fast construction (integrated XUI, XUtil, XAOP, XPage, XUpdate, XHttp2, Umeng Statistics and Walle multi-channel package). Android空壳模板工程,快速搭建(集成了XUI、XUtil、XAOP、XPage、XUpdate、XHttp2、友盟统计和walle多渠道打包)
1.在settings.gradle文件中加入依赖 maven { url "https://jitpack.io" }
dependencyResolutionManagement {
    repositoriesMode.set(RepositoriesMode.FAIL_ON_PROJECT_REPOS)
    repositories {
        google()
        mavenCentral()
        //导入maven
        maven { url "https://jitpack.io" }
    }
}
2.在build.gradle 引入 implementation 'com.github.xuexiangjys:XUI:1.1.5'
dependencies {

    //xui
    implementation 'com.github.xuexiangjys:XUI:1.1.5'

    implementation 'androidx.appcompat:appcompat:1.4.1'
    implementation 'com.google.android.material:material:1.5.0'
    implementation 'androidx.constraintlayout:constraintlayout:2.1.3'
    testImplementation 'junit:junit:4.13.2'
    androidTestImplementation 'androidx.test.ext:junit:1.1.3'
    androidTestImplementation 'androidx.test.espresso:espresso-core:3.4.0'
}
3. 写个类继承 Application 重写onCreate方法 加入
XUI.init(this); //初始化UI框架
XUI.debug(true); //开启UI框架调试日志
import android.app.Application;

import com.xuexiang.xui.XUI;

public class XuiActivity extends Application {
    @Override
    public void onCreate() {
        super.onCreate();

        XUI.init(this); //初始化UI框架
        XUI.debug(true);  //开启UI框架调试日志
    }
}
4.在AndroidManifest.xml中加入 这个类 android:name=".XuiActivity"
<?xml version="1.0" encoding="utf-8"?>
<manifest xmlns:android="http://schemas.android.com/apk/res/android">

    <application
          <!-- 加入-->
        android:name=".XuiActivity"

        android:allowBackup="true"
        android:icon="@mipmap/ic_launcher"
        android:label="@string/app_name"
        android:roundIcon="@mipmap/ic_launcher_round"
        android:supportsRtl="true"
        android:theme="@style/Theme.MyAppday3">
        <activity
            android:name=".MainActivity"
            android:exported="true">
            <intent-filter>
                <action android:name="android.intent.action.MAIN" />

                <category android:name="android.intent.category.LAUNCHER" />
            </intent-filter>
        </activity>
    </application>

</manifest>
5.把样式改一下
基础主题类型:

大平板(10英寸, 240dpi, 1920*1200):XUITheme.Tablet.Big


小平板(7英寸, 320dpi, 1920*1200):XUITheme.Tablet.Small


手机(4.5英寸, 320dpi, 720*1280):XUITheme.Phone


<resources xmlns:tools="http://schemas.android.com/tools">
    <!-- Base application theme. -->
    <style name="Base.Theme.MyAppday3" parent="XUITheme.Phone">
        <!-- Customize your light theme here. -->
        <!-- <item name="colorPrimary">@color/my_light_primary</item> -->
    </style>

    <style name="Theme.MyAppday3" parent="Base.Theme.MyAppday3" />
</resources>
6.即可在布局中添加相关组件
<?xml version="1.0" encoding="utf-8"?>
<LinearLayout xmlns:android="http://schemas.android.com/apk/res/android"
    xmlns:app="http://schemas.android.com/apk/res-auto"
    xmlns:tools="http://schemas.android.com/tools"
    android:layout_width="match_parent"
    android:layout_height="match_parent"
    tools:context=".MainActivity">

    <ScrollView
        android:layout_width="match_parent"
        android:layout_height="wrap_content">

    <LinearLayout
        android:layout_width="match_parent"
        android:layout_height="wrap_content"
        android:orientation="vertical"
        android:gravity="center"
        >
    <com.xuexiang.xui.widget.button.roundbutton.RoundButton
        style="@style/RoundButton.Auto"
        android:layout_marginTop="20dp"
        android:text="默认圆角大小" />

    <com.xuexiang.xui.widget.button.roundbutton.RoundButton
        style="@style/RoundButton.Auto"
        android:layout_marginTop="20dp"
        android:text="自定义样式"
        android:textColor="@color/xui_default_round_btn_white_text"
        app:rb_backgroundColor="@color/xui_round_btn_green_bg"
        app:rb_borderColor="@color/xui_round_btn_green_bg" />

    <com.xuexiang.xui.widget.button.shadowbutton.ShadowButton
        android:layout_width="100dp"
        android:layout_height="100dp"
        android:layout_margin="16dp"
        app:sb_ripple_duration="2000"
        android:background="@mipmap/ic_launcher"
        app:sb_ripple_color="@color/app_color_theme_8"
        app:sb_color_pressed="@color/app_color_theme_6"
        app:sb_radius="6dp" />


    <com.xuexiang.xui.widget.button.ButtonView
        style="@style/ButtonView.Blue"
        android:layout_margin="20dp"/>

    <com.xuexiang.xui.widget.button.ButtonView
        style="@style/ButtonView.Green"
        android:layout_margin="20dp"/>

    <com.xuexiang.xui.widget.button.ButtonView
        style="@style/ButtonView.Gray"
        android:layout_margin="20dp"/>
<!-- 倒计时button-->
        <com.xuexiang.xui.widget.button.CountDownButton
            android:id="@+id/bt_countdown4"
            style="@style/Button.Blue"
            android:text="获取验证码" />

        <com.xuexiang.xui.widget.button.switchbutton.SwitchButton
            android:id="@+id/sb_ios"
            style="@style/SwitchButtonStyle"
            android:layout_width="wrap_content"
            android:layout_height="wrap_content"
            app:swb_animationDuration="300"
            app:swb_backDrawable="@drawable/ios_back_drawable"
            app:swb_thumbDrawable="@drawable/ios_thumb_selector"
            app:swb_thumbMarginBottom="-8dp"
            app:swb_thumbMarginLeft="-5dp"
            app:swb_thumbMarginRight="-5dp"
            app:swb_thumbMarginTop="-2.5dp"
            app:swb_thumbRangeRatio="1.4" />


        <com.xuexiang.xui.widget.button.RippleView
            android:layout_width="match_parent"
            android:layout_height="wrap_content"
            android:layout_marginTop="?attr/xui_config_content_spacing_horizontal"
            app:rv_type="simpleRipple">

            <TextView
                android:layout_width="match_parent"
                android:layout_height="100dp"
                android:layout_gravity="center"
                android:layout_marginStart="?attr/xui_config_content_spacing_horizontal"
                android:layout_marginEnd="?attr/xui_config_content_spacing_horizontal"
                android:background="@color/app_color_theme_1"
                android:gravity="center"
                android:text="单波纹"
                android:textColor="@color/xui_config_color_white"
                android:textSize="20sp" />

        </com.xuexiang.xui.widget.button.RippleView>

        <!-- 悬浮按钮-->
        <com.google.android.material.floatingactionbutton.FloatingActionButton
            android:layout_width="50dp"
            android:layout_height="50dp"
            app:borderWidth="10px"
            android:backgroundTint="@color/app_color_theme_4"
            app:rippleColor="@color/app_color_theme_3"
            />


        <com.xuexiang.xui.widget.button.SwitchIconView
            android:id="@+id/switchIconView3"
            android:layout_width="wrap_content"
            android:layout_height="wrap_content"
            android:layout_gravity="center"
            android:padding="8dp"
            app:siv_disabled_alpha=".5"
            app:siv_disabled_color="#dadada"
            app:siv_enabled="true"
            app:siv_tint_color="#ffb700"

            app:srcCompat="@drawable/ic_camera" />


        <com.xuexiang.xui.widget.button.SmoothCheckBox
            android:id="@+id/scb"
            android:layout_width="40dp"
            android:layout_height="40dp"
            android:layout_margin="5dp"
            android:paddingTop="10dp"
            app:scb_color_checked="@color/app_color_theme_1" />


        <com.xuexiang.xui.widget.button.shinebutton.ShineButton
            android:id="@+id/shine_button"
            android:layout_width="30dp"
            android:layout_height="30dp"
            android:layout_gravity="center"
            app:sb_checked_color="#f26d7d"
            app:sb_icon_image="@drawable/ic_heart"
            app:sb_normal_color="@android:color/darker_gray" />

        <com.xuexiang.xui.widget.button.shinebutton.ShineButton
            android:id="@+id/shine_button_1"
            android:layout_width="30dp"
            android:layout_height="30dp"
            android:layout_gravity="center"
            android:src="@android:color/darker_gray"
            app:sb_allow_random_color="false"
            app:sb_big_shine_color="#FF6666"
            app:sb_checked_color="#FF6666"
            app:sb_click_animation_duration="200"
            app:sb_enable_flashing="false"
            app:sb_icon_image="@drawable/ic_like"
            app:sb_normal_color="@android:color/darker_gray"
            app:sb_shine_animation_duration="1500"
            app:sb_shine_count="15"
            app:sb_shine_distance_multiple="1.5"
            app:sb_shine_turn_angle="10"
            app:sb_small_shine_color="#CC9999"
            app:sb_small_shine_offset_angle="20" />


    <!-- button xui-->
    <com.xuexiang.xui.widget.button.ButtonView
        android:id="@+id/buttonView"
        style="@style/ButtonView.Green"
        android:layout_width="50dp"
        android:layout_height="50dp"
        android:layout_marginTop="237dp"
        android:layout_marginBottom="69dp"
        app:layout_constraintBottom_toTopOf="@+id/textView"
        app:layout_constraintEnd_toEndOf="parent"
        app:layout_constraintStart_toStartOf="parent"
        app:layout_constraintTop_toTopOf="parent" />


    <TextView
        android:layout_width="wrap_content"
        android:layout_height="wrap_content"
        android:text="Hello World!"
        app:layout_constraintBottom_toBottomOf="parent"
        app:layout_constraintEnd_toEndOf="parent"
        app:layout_constraintStart_toStartOf="parent"
        app:layout_constraintTop_toTopOf="parent" />

         </LinearLayout>

    </ScrollView>
</LinearLayout>
实例图: 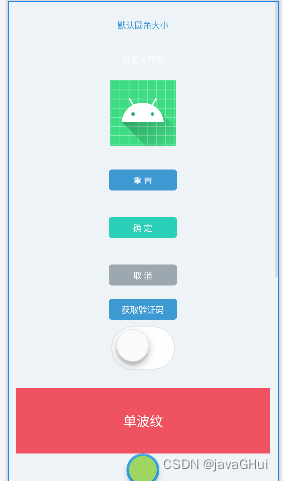
相关资源:导入项目后,在源项目码中自己找 Ctrl+N